|
     2018 UpdateEconologica.org 2018 UpdateEconologica.org
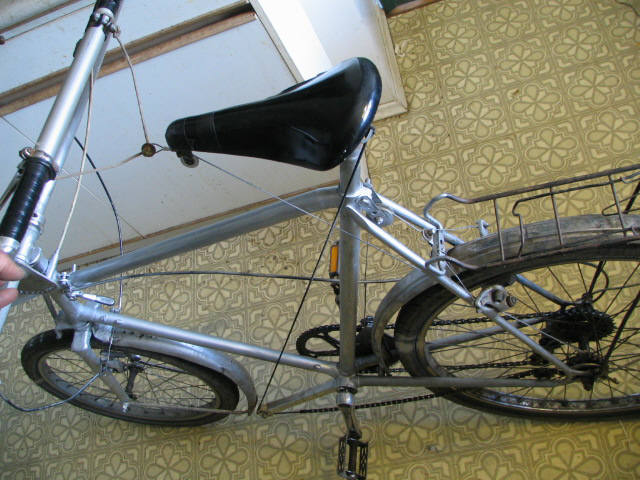
Farthing Penny Arm
Push Power Grocery Bike
2013: VIDEO N.B YOU assume ALL responsibility in using this FREE webpage info
The low stemhead on the Farthing Penny due to the
small “farthing” front wheel
suggested a U handlebar that
would clear the bucket even when raked forward. Then hinging the bottom of
the handlebar would allow a forward and back oscillation of the straight
handle crossbar crowning the uprights.
During this rowing, steering can still be effected by opposing the
arms. Pushing against the body weight on the saddle, the
forward
stroke pulls a chain around a BMX 16T ‘Southpaw” left-handed freewheel on
the left side of the rear wheel.
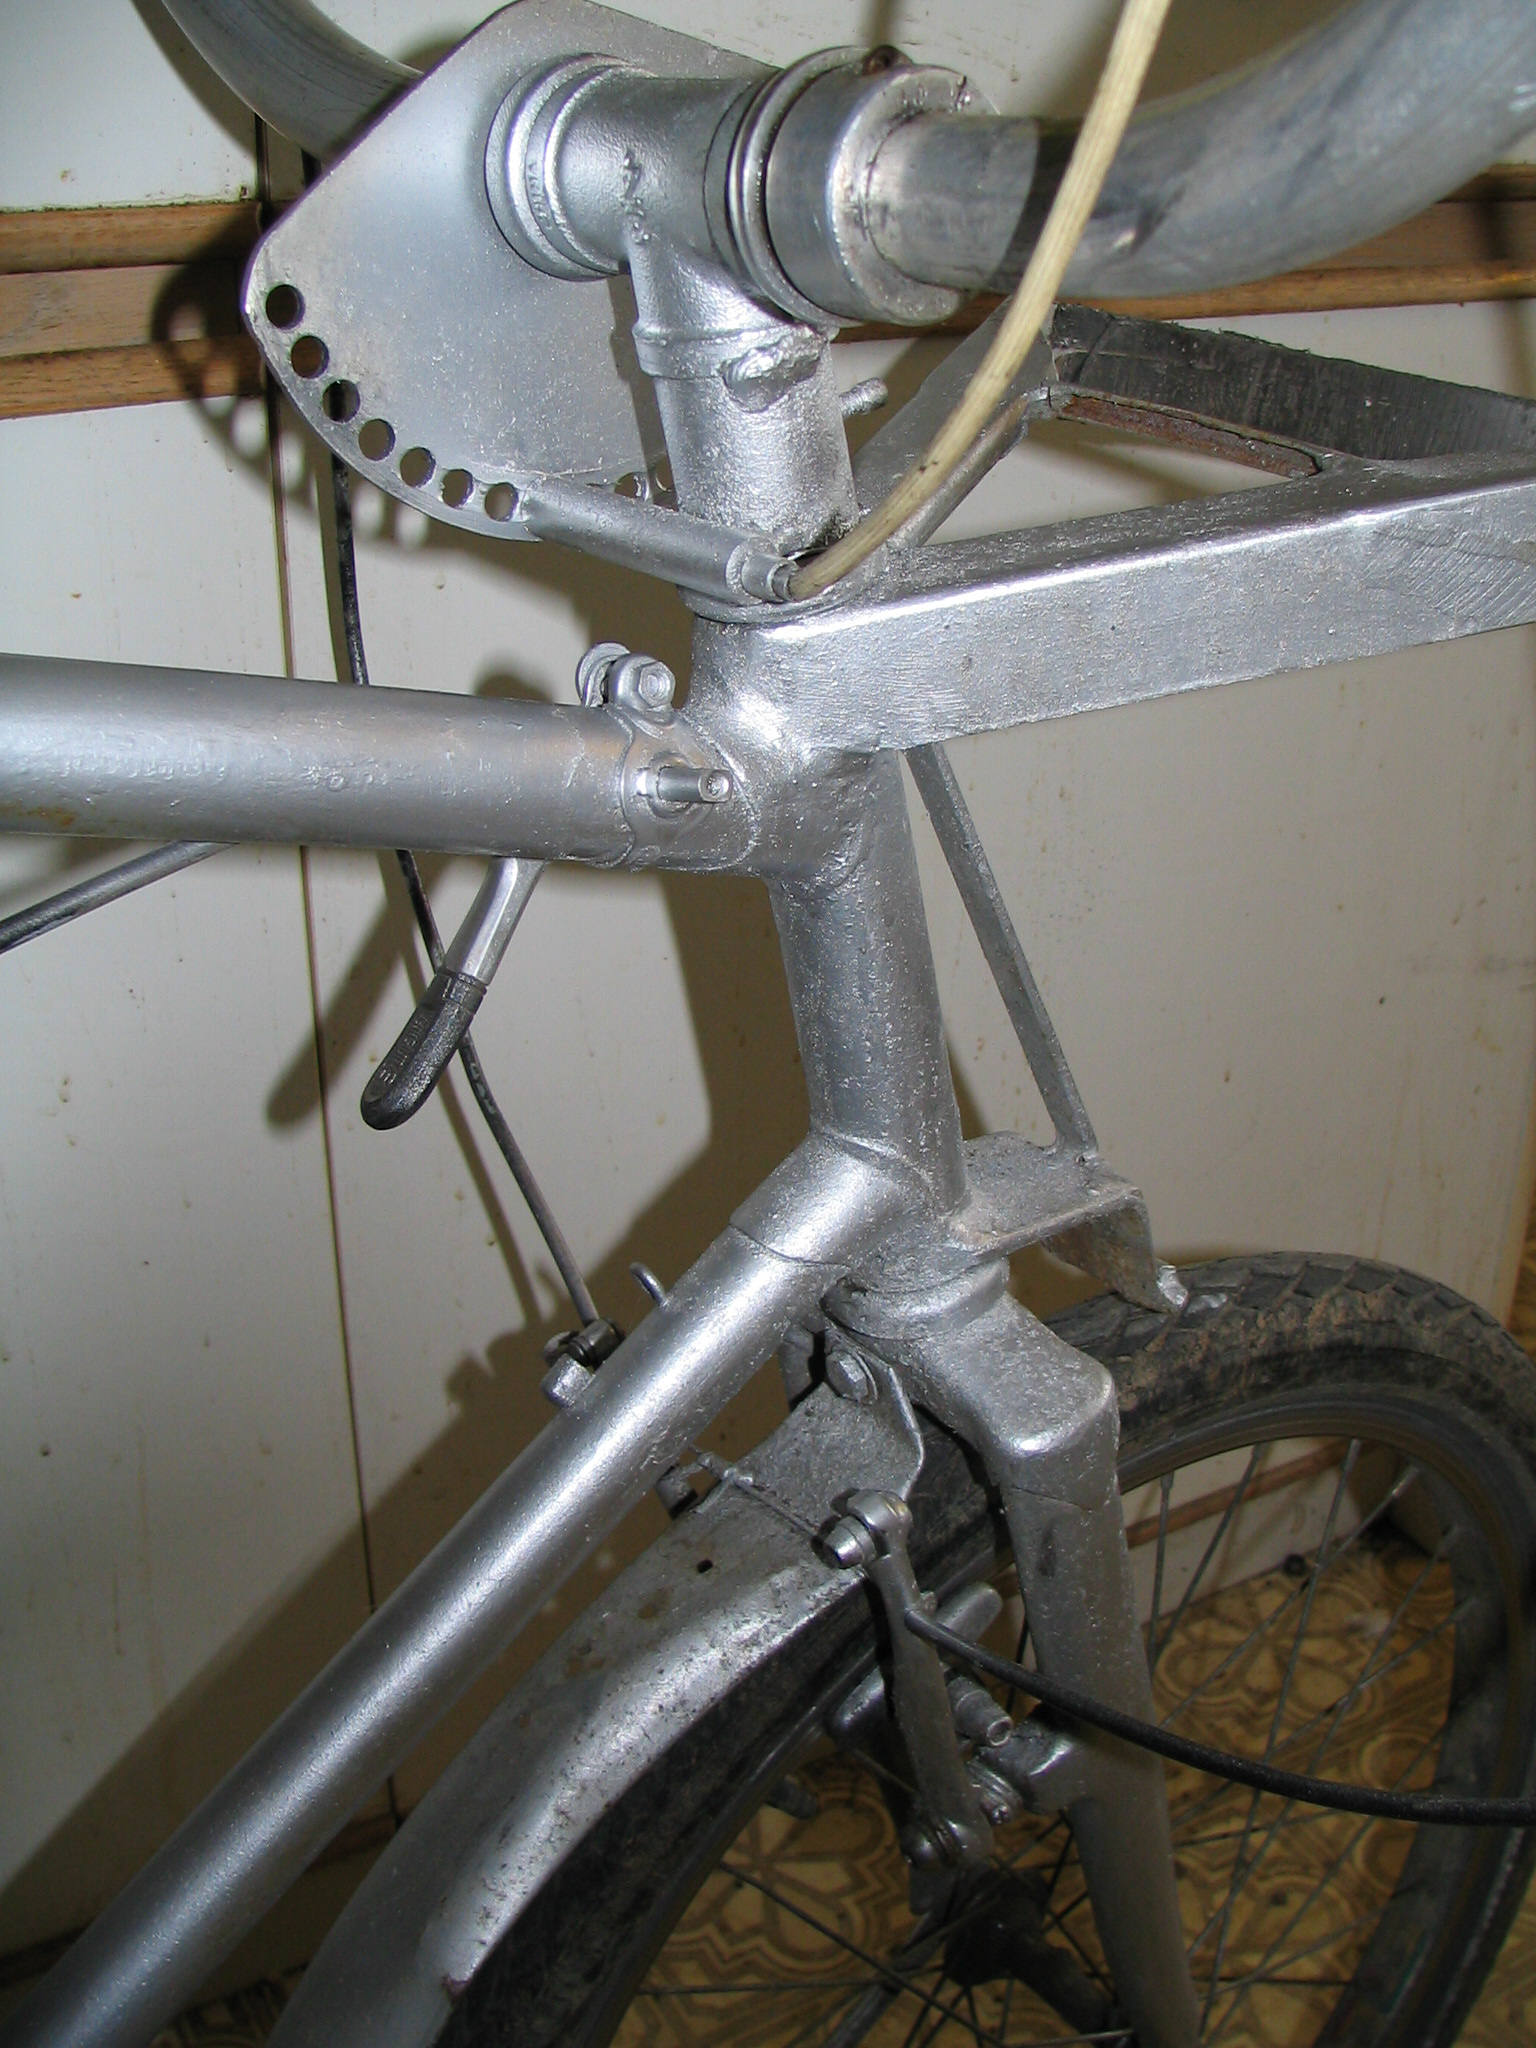
The key control mechanism is a pin
which is sprung into a plate with an arc of holes to lock the handlebars in
various fixed rakes and for support during braking. It is unlocked by a
Bowden cable when the rear brake lever is held open beyond a limit set on
the rear caliper opening. As soon as
the right fingers stop pushing the lever wide open, the spring locks the
handlebars for support. The locking pin engagement in a hole will be
visible for extra safety
The arm-pumping gives a welcome boost to keep
the mean speed up and avoid downshifting on grades and gives a whole body
workout. Exhaling hard in the
forward push achieves synchrony of the two chest-tightening actions.
The handgrips inside of the uprights protects the hands and narrows and compacts the bike for less
windage, safely sharing narrow paths with pedestrian and easier
storage. Dangerous bottoming out of
the brake levers, and snagging by the levers and handlebar ends are all
eliminated..
Besides locking at forward rake, one can crouch by holding the
handlebars at the bottom of the U. This,and carrying cargo in 1 hand needs
a backpedal brake for safety
The latest 2013 model has stronger ¾”
pipe steel instead of 1” x.9 tube for the stemtube. At 1.050x.824” it just
passes through 1” standard stem bearings because the cones are 1/16“
oversize. The opposite ends of a ¾” cast iron T are bored out to accept the
handlebar cups. The T is screwed tight onto the end of the stem pipe into
alignment with the forks with a sleeve machined for the right stem bearing
tightness. Then the sleeve is Nickel tacked to the T and the locking pin
barrel is welded across the sleeve at 2.5” radius. The handlebars were bent
cold with a pipe hickey with the T and bearings and a slit clamp loose
between the bends. The pin
engages holes in an aluminum sector
TIG welded on the backside to the handlebar and seating a cone on the
inside. The adjusting cone on the other side seats on the slit clamp
tightened on the handlebar tube. The
locked handlebars are very stiff and strong to decelerate the rider in hard
braking.
The top crossbar of
1”x7/8” aluminum was miter TIG’d to the uprights. Its stiffness is
now exploited to just bridle between the inboard clamp ends of dual front
brake levers that pull symmetrically through crossed Bowden loops that flow
with the handlebar into the horizontal linear pull front brake from both
sides with a center nicopress wire joint
The brake arms are cantilevered on the back of the front fork to not
interfere with the bottom support of the cargo bucket (pronounced
“Bouquet”!) just above the small front tire and clear of the fork crown.
Pushing the extended-range right brake
lever open pulls the pin through a third Bowden cable to unlock the
handlebars for armpower assist. The bridle snaps onto the eye end of a wire
passing through a pulley swinging on weldment to the frame of the
saddlenose. This point gives the best pushing angle and least pulley
contact. Now the slack side of the chain passes over an idler welded to the
inside of the chain stay and then under the chainstay and bottom bracket to
a shockcord and then around a sheave just shy of the front fender to return
to the back of the seat. This rearrangement means the chain return is now
using gravity not fighting it as before and further from the trousers.
Independent of the hands and
handlebars, the rear wheels cantilever brake is applied by my backpedalling mechanism. A single standard diamond road frame was
cut reversed and rewelded at the front lugs of the seat-tube front joints
to give the small (Farthing) front wheel with room above for the cargo
bucket (pronounced Bouquet!).The design is
easily made into a “Farthing ha’penny” folding bike; conversely a folding bike
is improved by backpedal braking, armpower, and bucket cargo.
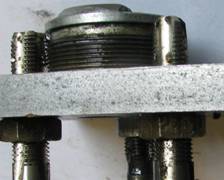
An improvised die cut left hand threads on the
aluminum hub of an existing spoked wheel for the 16T ACS Southpaw freewheel
for the left hand arm assist drive. Most hubs are about the correct
diameter on the left hand side so lefthand threading with the “tap” die avoids tedious
unspoking/spoking. In the 1.375”x24tpi LH die the .330” tap holes are evenly
spaced on a circle of 1.705”. They are tapped with the same the 3/8-24
right hand tap through a faced nut vised against the plate and
progressively rotated 120 (2 corners) clockwise in clockwise succession.
The die can be adjusted by locknutting the taps so their cutting edges are
not quite radial to the big circle. It is best to have the 16T ACS Southpaw
freewheel and remover in hand to test tightness.
The frame design began with ubiquitous 5 gallon
bucket and the cheap pail organisers that are mass produced for the
building trades. These hang over the bucket rim with numerous pockets on
the inside and outside. The inside pockets are useful for small valuable
‘purse’ items like a notepad, cheque book, pens and mobile phones which
help prevent fruitless tiring cycling. The outside pockets are good for
spare inner tubes, glasses cases, bike tools etc. Instead of adding wind
resistance, a front mounting provides a bit of a round entry fairing to the
body behind. The maximum 45 lbs of 5 gal bucket full of liquid then evens
the weight on each wheels at 100lbs for a 175 lb adulta standard bucket to transport cargo
(mainly groceries) in living without a car and a bucket organizer as a sort
of bike purse.
A smaller front
wheel lower the weights of the cargo and the top of the bucket below the
arc of the handlebars. The grocery delivery and Paschley Post Office bikes
in the UK have slightly smaller front wheels under their trays attached to
the frame The stability and control
of a bicycle are largely governed by the steering front wheel, and folding
bicycles have shown that a small front wheel has very good balance as well
as high manoeuvrability.
But the standard rear frame is a lighter
way to stiffly support the seat and a fullsize rear wheel allows light yet high
derailleur gearing. So the idea was to just change the frame ahead of the
seat-tube to allow a small front wheel but to keep it and the handlebars
stiff. Since the steering tube is
parallel to the seat tube, the front end can be lowered by cutting the
front and top tubes at the seat tube. For a match the tubes should be cut
at the same angle to the seat-tube. Since the original top tube is smaller
it should be cut say ¼” minimum clear of any lug, so that the downtube can
then locate over this stub flush with the lug. The downtube should be cut at its lug outer edge for
this. The clean end of the downtube will fit inside what is left as deep as
possible. The overlaps and lugs if present allow stick welding
A bracket to hold
the bottom lip of the bucket is welded to the bottom of the steering tube
just above the tire, and a circle of banding strap projected from the top
of the steering tube holds the bucket dropped into place. (Panniers require
extensive frames and support points to keep them out of the spokes,
complicating removal. In the front their weight and volume capacity is
limited by turning with the wheel. Rear panniers or racks do not allow
monitoring the contents when riding and add extra spoke-breaking load to
the rear wheel which already bears 110 lbs
of a 175 lb rider. Backpacks have a particularly high center
of gravity again too far back and exacerbate the differential cooling
problem that leads to a wet and clammy back yet a frozen front.) to make the Farthing Penny compact
luggage if required.)
|